The physio and bike fitter's guide to setting your saddle height
How to adjust your bike seat height and know when you’ve got it right - eliminate pain and get the most from your body
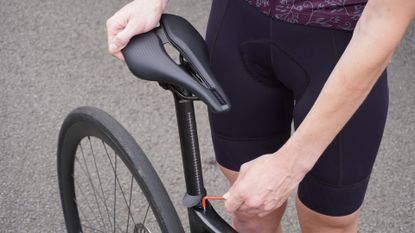
Setting the correct saddle height on your bike is essential for comfort, efficiency, performance and to avoid injury, which will ultimately allow you to ride longer and push harder.
Not only is it important to choose a bike saddle that's right for you (the best bike saddle varies from rider to rider as we're all built a little differently), finding the optimum saddle height is the foundation of setting up your bike, whether that's with a bike fitter or as part of a DIY bike fit at home.
The saddle height measurement is the distance from the pedal surface to the top of the saddle with the crank arm down and in line with the seat tube. It may also be measured from the centre of the bottom bracket to the top of the saddle, which does not take into account crank length.

Nicole Oh is a physiotherapist and bike fitter, with training in biomechanical assessments, sports injury rehabilitation, acupuncture and clinical pilates. She's an avid racer and lives in Sydney.
How to set your own bike saddle height
There are a number of basic methods and calculations that can be used as a starting point to set saddle height. Most are based on a relationship between saddle height and lower limb length (inseam), or a reference range for knee joint flexion.
However, none of these methods take into account individual characteristics such as flexibility, pedalling style or limb proportions. Formulas are based on averages and mathematics, so it’s worth being aware that they may not give an accurate result for a lot of people.
Heel (or Heel-toe) method
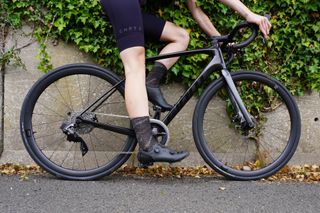
This method requires no equipment and can be used as a quick and easy way to set saddle height. In fact I have suggested to clients to use this method on some occasions where an approximation is sufficient, such as if using an exercise bike at a gym or as a starting point if they have little cycling history.
Get The Leadout Newsletter
The latest race content, interviews, features, reviews and expert buying guides, direct to your inbox!
With the crank in line with the seat post, the cyclist sits on the saddle and puts their heel on the pedal with the knee fully straight (locked out). They should be able to pedal backwards without losing contact of their heel on the pedal at the bottom of the pedal stroke, or tilting their pelvis down to reach the bottom of the pedal stroke. The foot is then placed on the pedal with the ball of the foot over the pedal axis.
LeMond method
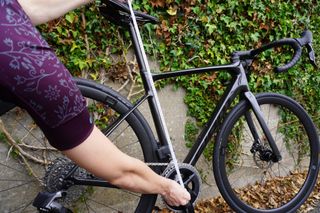
This method calculates saddle height by multiplying inseam by 0.883, the measurement being from the centre of the bottom bracket to the top of the saddle. It does not take into account crank length.
The easiest way to measure inseam is to stand against a wall, without shoes, with your feet
shoulder width apart, then place a book (or similar) firmly up between your legs. Mark the point on the wall at the top of the book and measure this distance to the floor. This is your inseam measurement.
Hamley method
This method also uses inseam to calculate saddle height, but the resulting measurement is from the surface of the pedal to the top of the saddle, and hence includes crank length. Multiply your inseam by 1.09 to get this measurement.
Holmes method
According to the Holmes method, the ideal static knee angle at the bottom of the pedal stroke is at 25 to 35 degrees. On a turbo trainer, pedal until you feel comfortable on the saddle, then stop pedalling at the bottom of the pedal stroke. Have an assistant use a goniometer to measure knee angle in this position, using the lateral femoral condyle at the knee, lateral malleolus at the ankle, and greater trochanter at the hip as landmarks.
Research has suggested that the Holmes method can prevent common cycling overuse injuries and enhance performance, with increased anaerobic power at a 25 degree knee angle, and increased aerobic efficiency at a 25 degree knee angle compared to at 35 degrees.
How accurate are these bike saddle height setting methods?
There have been a number of studies that indicates static methods based on anthropometric measurements (88.3% or 109% of inseam) does not ensure an optimal knee angle during pedalling. A study by Peverler et al (2007) has shown that using 109% of inseam is unreliable and falls outside the recommended 25 to 35 degree knee angle greater than half the time.
I carried out my own analysis of how these formulas corresponded to the saddle height set from a full comprehensive bike fit in our clinic, taking a random sample of 20 riders, and found a similar pattern.
A possible reason for the differences is that the measurement does not take into account individual variations in femur, tibia, and foot lengths. These individual variations cannot be accounted for by inseam alone and result in the wide variations in knee angles.
Another possible reason could be because the majority of the studies for predicting seat height from inseam length were done a long time ago (around the 1990s), when toe clips instead of clipless pedals were used.
Of these methods, it is preferable to use one that sets saddle height according to knee angle rather than a formula, although there is no absolute consensus on what this angle should be. There is also room for error when using this method to determine ideal bike saddle height.
The accuracy of finding and marking anatomical landmarks is important, which may be difficult for untrained individuals. Knee angle measurement depends on the ankle angle, so care must be taken to ensure the ankle is in the same position when statically measured as to how it operates dynamically during the pedal stroke. There is also some variation in at what point knee angle is measured - some use bottom dead centre (crank at 90 degrees), whilst others use the point of maximum knee extension with the crank in line with the seat post.
Studies show that knee angle varies depending on whether a static or dynamic measurement is used. A study suggested that the knee flexion angle of 25 to 35 degrees during a static evaluation could correspond with an angle of 30 to 40 degrees during a dynamic evaluation. Dynamic measurements require the use of video or motion capture equipment. Furthermore, a literature review suggested that optimal dynamic knee angle varies depending on the intensity of cycling, with the ideal range being 33 to 43 degrees at bottom dead centre (BDC) at low intensity and 30 to 40 degrees at BDC at high intensity.
What else influences saddle height?
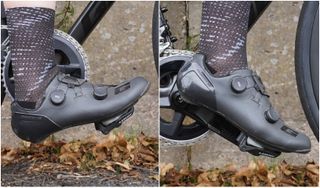
Your ankle position can both determine what height you saddle should be set, as well as give an indication that your saddle height is not ideal. For instance, those with a toe down pedalling style will have relatively less knee extension at BDC (resulting in a relatively lower saddle), or it may be a compensatory pattern for a saddle that is too high with your foot reaching for the bottom of the pedal stroke.
Additionally, some people will change their pedalling style under high load or effort. A common practice is dropping the heel in an attempt to engage the calf in power production, resulting in a relatively higher saddle.
Hamstring flexibility could also affect knee angle during dynamic pedalling. Inflexibility of the hamstring is related to greater knee flexion and a lower saddle position.
Your position on the saddle will influence the saddle height. Sitting forward on the saddle will effectively lower the saddle, sitting towards the back will effectively raise the saddle.
Equipment such as shoes and pedals may have different stack heights. Even amongst the best bib shorts, the chamois' may have different thicknesses. Your saddle height may need to be adjusted if changing equipment.
How to know if your saddle height is correct
A correctly placed saddle should result in:
- A stable pelvis with your sit bones supported - tilting of the pelvis from side to side may indicate the saddle is too high.
- A stable foot - there should not be excessive toe down or heel down.
- A smooth pedal stroke - a “dead spot” or a feeling of losing contact at the bottom of the pedal stroke may mean the saddle is too high.
- Not continually moving on saddle - we often move forward or back on the saddle to find ideal knee extension.
- Balanced recruitment of muscles with an even load and tension through the muscle groups eg. not quad dominant
- Minimal discomfort, particularly in the knee (front, back or side)
The repetitive nature of cycling means it is important to have the correct saddle height to help prevent injury. Common issues resulting from an inappropriate saddle height include knee pain, saddle discomfort (pressure, numbness, sores), hip pain/impingement, hamstrings tendiopathy, back pain, achilles issues, neck pain, and hand and wrist pain/numbness. However, you don’t necessarily need to have pain or injury for the saddle height not to be optimal.
How to determine the optimal saddle height
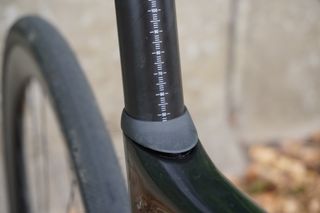
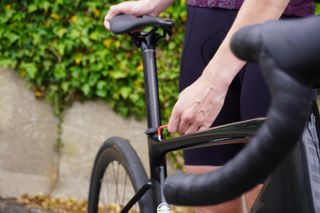
The above methods can be used as a starting point for setting saddle height, but getting the correct saddle height requires making small adjustments (2mm at a time) based on feedback and awareness. If after this trial and error the saddle height, or position in general, still does not feel right, then you may require the skills of a bike fitter.
Height is not the only thing about the saddle that needs to be considered - the fore/aft position of the saddle, saddle tilt, and saddle characteristics (width, shape, firmness, cut out etc) will influence whether you are comfortable and efficient when pedalling. Changing any aspect of the saddle position may require a small adjustment of the saddle height, as will changing cleat position. For example, moving the saddle up by 10mm will also move the saddle back by about 3mm due to the angle of the seat post.
The bike fitter will use their knowledge and highly trained observation skills to look at pedalling technique and style, smoothness, stability and compensatory strategies, as well as ask for feedback from you.
They will observe or measure joint angles and use information from your physical screening to determine the optimal saddle height and position for you.
Saddle position is the foundation of a good bike fit. Finding an appropriate handlebar stack and reach cannot be done well if a proper saddle position is not established first.

Thank you for reading 20 articles this month* Join now for unlimited access
Enjoy your first month for just £1 / $1 / €1
*Read 5 free articles per month without a subscription

Join now for unlimited access
Try first month for just £1 / $1 / €1
Nicole Oh is a physiotherapist and bike fitter, with training in biomechanical assessments, sports injury rehabilitation, acupuncture and clinical pilates.
A competitive cyclist with a background in triathlon, Nicole raced at National level in the UK, also managing and co-founding the Les Filles Racing Team. Having moved to Sydney, she works as a physiotherapist at The Body Mechanic and continues to race competitively.