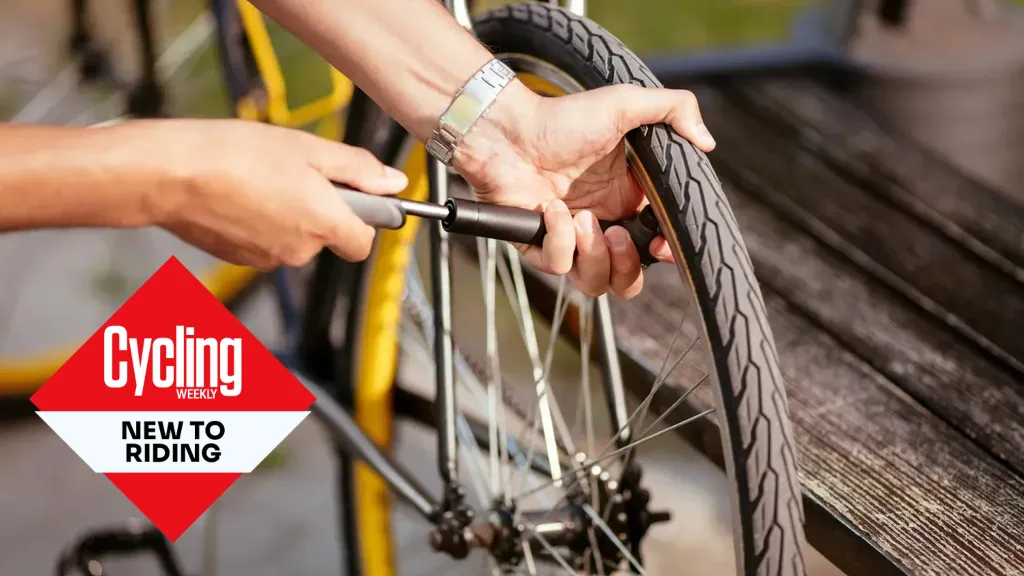
How to fix a puncture and patch a bicycle inner tube
Have the confidence to fix a puncture and banish the fear of getting a flat out on a ride.
This article has been freshly updated as part of our 'New to Riding' week, running from March 10 to March 17, with a special focus on tips, tricks and inspiration for new riders.
At some point as a cyclist, a flat tyre is inevitable. It's always an inconvenience, but becomes more so if you don't have the means to fix it, and it may leave you stuck on the roadside, alone.
You can be well prepared to change an inner tube by carrying all the road cycling essentials you need and having the expertise to carry it out. Our guide below (alongside the video above) takes you through the steps involved in fixing a puncture and should give you the confidence to deal with one next time you hear the dreaded hiss. Remember, practice makes perfect so test your skills in the comfort of your own home before you set out.
Don't throw away your punctured inner tubes: we explain how to patch one and give it a new lease of life. And, although most people run inner tubes, we've included a little guidance on how to fix a puncture with a tubeless road tyre setup too.
How to fix a bike puncture
Make sure you have everything you need on every ride. Being an expert at mending a puncture is only worthwhile if you have all the right tools too.
- Tyre levers
- Two (or more!) spare inner tubes
- Patches/repair kit
- Some bits of old tyre to reinforce big holes
- A pump
- Spanner (if your bike uses wheel nuts)
- Multitool (not specifically for fixing a puncture unless your bike requires it, but a good multitool should be part of your ride essentials anyway)
- A mobile phone for when you're stranded (or need to do a quick Google)
Step 1: Remove the wheel from the frame

Make sure you are in your smallest sprocket before removing your rear wheel.
- If you have rear wheel flat, shift down to the smallest cog on the cassette and the smallest chainring on the front.
- On a rim brake setup, you'll need to open the brakes by lifting the lever to slacken the cable.
- For cantilever or V-brakes, squeeze the brakes together and pop the cable out of its housing.
- Release and unscrew the quick-release skewer until there's enough slack to remove the wheel, or if using thru-axles, unwind all the way and remove. (You may need a tool for some thru-axles — be sure to check in advance).
- Fixed wheel or commuter bikes may require a 15mm spanner to remove wheel nuts.
- Gently pull out the wheel. With the rear wheel, you can release tension by pulling back the rear derailleur.
- It's worth having a quick scan of the wheel at this point to see if you can find anything obvious that caused the flat. Remove if necessary and make a mental note of where it is related to the valve. Be careful not to rub the palm of your hand over the tyre as there could be a sharp object protruding.
Step 2: Deflate the tyre fully

Take the dust cover off the valve
- Remove the dust cap (the black cap over the valve), if there is one.
- Unscrew and remove the valve retaining nut, if there is one.
- If you have a Presta valve, unscrew the top nut and press in to fully deflate the tube.
- If you have a Schrader valve, simply press the pin in the valve to release remaining air.
Step 3: Loosen the tyre on one side using tyre levers

Use tyre levers to remove the tyre from the rim
- Insert one tyre lever under the bead of the tyre (directly opposite the valve is best but anywhere will work) to start the process of lifting the tyre away from the rim.
- Hook this lever on a spoke to keep it in place and to leave your hands free.
- Insert the second tyre lever close to the first and gently try to slide it around the rim, lifting the tyre as you go.
- You'll get to a point where the tyre has been released enough and you can, fairly easily, run the lever around the entire rim to pop it off.
It's worth noting here that some tyres can be super tough to remove, and fit. And some tyre and wheel combinations even more so.
A set of strong tyre levers will help but remember, if you can't remove or fit a bike tyre at home without assistance, you won't be able to remove it on your own out on the bike in potentially bad weather. So practice at home, or swap them out for some that are easier to work with.
If in doubt, opt for a four-season tyre. This should be malleable enough to pop off the rim with a bit of encouragement, but will limit the risk of puncturing. By choosing the best puncture-proof cycling tyres, you'll save yourself a lot of hassle in the first place.
Step 4: Remove the inner tube and find the puncture
- Pull the inner tube out from the valve.
- Inspect the tube to find the cause of the puncture. If it's not obvious you can add some air and see where it escapes from. If you have no intention of repairing the tube there and then, you can skip this step but it can be a useful way of working out where in the tyre the puncture occurred, through cross referencing them.
Step 5: Check the tyre for debris
- Thoroughly inspect the tyre, inside and out.
- Remove the offending shard of glass, thorn or other object.
- This is an important step. If anything is left in the tyre, there is potential for another puncture down the road.
- If you can't find anything, it may be worth removing the tyre entirely, so you can turn it inside out.
Step 6: Replace the inner tube

Replace the inner tube
- If you decide to repair the tube, or you don't have a spare on you, there's more on this below.
- Add a small amount of air to the new or repaired tube to give it some shape (it's easier to insert and prevents pinching).
- Replace one side of the tyre if you had to remove it completely. If your tyre is directional — it will have an arrow somewhere on the sidewall — be sure it's on correctly.
- Push the valve through the valve hole. You can screw on the valve retaining nut if you have one to hold the valve in place.
- Work around the tyre, tucking the inner tube into the space between the tyre and the rim.
Step 7: Refit the tyre

Seat the tyre back into the rim by pushing with your thumbs
- Starting at the valve, grip the rim and push the tyre back on with your thumbs. Lift at the same time to prevent the tube getting pinched.
- Work around the rim, switching from one side to the other so you finish opposite the valve. Some tyres are trickier than others. If you get stuck, try letting a little air out, or resort to tyre levers with caution.
- Work around the wheel, pushing the tyre in slightly to check the tube hasn't been pinched and that there are no bulges.
Step 8: Inflate the tyre

Attach the pump to the valve and pump it up
- Pump up the tyre to your preferred pressure. Check our guide to the correct road bike tyre pressure if you are unsure.
- It's worth a quick visual inspection of the tyre when you get to about 30-40psi, just to check again that there are no bulges of the inner tube, and that it's not going to explode as you get to higher pressures.
- If your mini pump doesn't have a gauge, or you're using CO2, you'll have to make a rough guess of the pressures. It's worth having an idea of how your tyres feel to squeeze when they're fully inflated, before you leave on your ride. Pumps are not all created equal, so it's a good idea to do some research and pick the best mini pump possible.
- Put the wheel back on the bike, refit and tighten skewers and tighten the quick release on your brakes if necessary.
- Check the wheel is spinning freely.
How to patch a bicycle inner tube

Apply a patch to the inner tube if you're mending it
Inner tubes can be quite expensive and they're easy to fix, so it's a good idea to mend them instead of simply replacing one and chucking the old rubber. Using a puncture repair kit is also better for the environment. To save time, carry an inner tube on rides for a quick swap, then take the damaged one home to fix another time.
Follow the steps below for easy bike inner tube repairs. Self-adhesive patches negate the glue faff, so if you have these then you can skip steps 4 and 5. These patches are also a great choice for roadside emergency repairs.
- Step 1: If the puncture is not obvious, pump up the inner tube to hear any air escaping, or run the inner tube past your lips to sense the escaping air. If you are still struggling to find the location, you can always submerge a re-inflated tube in a bucket or sink of water (or a puddle if you're out on the bike) and you should see the tell tale signs of bubbles where air is escaping.
- Step 2: Roughen the area around the hole with emery paper from your puncture repair kit.
- Step 3: Remove excess emery or tyre dust.
- Step 4: Apply enough glue to cover an area a little bigger than the repair patch that you’ll use.
- Step 5: Repeat glue application a couple of times, allowing the glue to dry in between.
- Step 6: Remove backing to a patch and stick over the hole.
- Step 7: Press down, working from the centre outwards.
- Step 8: When you're confident the patch is secured, carefully remove any further film attached to the patch.
How to fix a tubeless puncture?

Don't ride a tubeless setup without carrying a tubeless repair kit
Although a tubeless setup is not immune from the risks of a puncture, it does use sealant designed to fill in small holes. You may not even notice something sharp has got in your tyre, or you may hear a hiss and see some sealant on the tyre, but simply have to top up with some air.
Sometimes though, the hole is too big or you're just really unlucky, and sealant alone won't do the trick.
It's always worth carrying a spare inner tube, even when riding tubeless, so you can undertake the messy task of fitting it in an emergency.
The standard method for fixing a tubeless puncture is to plug it, but you may occasionally need to patch a hole (which would be done in the same way you would patch an inner tube).
First up, you'll need to make sure you're carrying:
- a Tubeless repair kit with plug tool and plugs
- a pump
Learn how to plug a hole in the steps below, so you can feel confident in your tubeless setup.
- Step 1: Find the puncture and remove the culprit (if your tyre is very soft, you can squeeze it behind the puncture to help push debris up and out).
- Step 2: Use a plug tool to enlarge the hole by inserting and twisting, but don't go crazy.
- Step 3: Fit the most appropriate size of tubeless plug to the forked plug tool by pushing the centre of the plug in between the forks and folding down the plug on either side.
- Step 4: Insert it into the hole, but not all the way through.
- Step 5: Twist the tool while slowly removing it, leaving the plug sticking out of the end of the hole.
- Step 6: Inflate the tyre and rotate the wheel so the hole is near the ground and the sealant can do its job.
- Step 7: If the plug ends stick out too far you can trim them, but they will wear down slightly as you ride.
FAQs
How do I know what inner tube I need?
In general, there are two types of valve on an inner tube: Presta and Schrader.
A Schrader valve is the same as you’ll find on a car tyre and to inflate it you simply have to use a pump with a compatible adapter. To deflate it you have to push a little pin found inside the valve.
Presta valves are thinner with a small captive nut found near the top. To inflate you need to unscrew the captive nut fully before using a pump with a suitable adapter. To deflate you unscrew the captive nut, then push it ‘in’ towards the base of the valve.
There are several different types of tubes on the market, which vary in material, rubber or latex for example, or in puncture protection level.
Check your spare tubes have the correct valves and that they're long enough for your rims. People often upgrade wheels to deep section rims, but forget to get new spare tubes with longer valves.
Finally, also check you have a compatible pump or inflator. Most will cater for both Presta and Schrader valves, but it's better to be safe than sorry.
Do check out our guide on bike inner tubes to help you navigate your choices.
How can I stop getting flat tyres on the bike?
If you find you're getting regular punctures, it's a good idea to check your tyres are still in road-worthy condition and appropriate for the type of riding you're doing.
Choice of tyres is almost as important as the wheels or frame. First of all your tyres need to be the correct size to fit your wheels. Then they need to be pumped up the appropriate pressure, as mentioned above.
Too much pressure could blow the tyre off the rim and too low a pressure can cause pinch punctures and tyre wall or rim damage.
It’s also best if they are the right tread for the surface that you are riding on, the time of year and what riding you'll be doing.
Tyres that are smooth because they are worn out are useless and dangerous. Tyres that have a series of tiny cracks in the sidewalls or between the tread blocks need replacing too.
From time to time, a tyre may have some internal damage which results in a bulge somewhere around its circumference; this is another occasion when the only remedy is a new tyre.
Finally, the inner tube. Make sure any replacement inner tube is the right size for the tyre, and that you have the right type of valve to fit through the hole in the wheel rim. See below for valve types.
Can I ride a bike tyre with a hole in it, and can it be fixed?
If the hole in the tyre is large, this may cause the inner tube to bulge through the gap, like a hernia. If this is the case, replacing the tube will just result in another puncture.
The solution is to reinforce the hole, with an old piece of tyre from the inside. In desperate situations we have even seen energy gel wrappers used for this purpose. This is an emergency fix, however, and should only be used to get you home or to your nearest bike shop.
Don't ride on determined to hit your mileage target only to get stranded when the tyre completely fails.
Get The Leadout Newsletter
The latest race content, interviews, features, reviews and expert buying guides, direct to your inbox!
A cyclist for over 10 years, Cat started on the road and track, and now loves riding the trails and racing cyclocross. A freelance writer with many years of experience, when not writing or turning left at Herne Hill Velodrome, she likes to spend her time in the mountains, preferably on a bike or snowboard.
You must confirm your public display name before commenting
Please logout and then login again, you will then be prompted to enter your display name.
-
 Aero bikes with gravel wheels?: Six tech insights from Paris-Roubaix Femmes
Everything we found out about tyre widths, self-inflating systems, and wheel choices from the cobbled Monument
By Tom Davidson Published
-
 'This race is absolutely disgusting': Peloton reacts to another brutal Paris-Roubaix Femmes
Now in its fifth edition, Paris-Roubaix Femmes is still a tough race, even for the best bike riders in the world
By Adam Becket Published


